Cakewalk // Documentation // SONAR X2 // Using the Tempo view
Table of Contents Previous Next Index

Arranging and editingChanging tempos ► Using the Tempo view

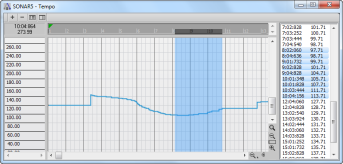
The Tempo view provides both a graphic display of the tempo and a list of all tempo changes in your project. In the graphical display you can use your mouse to draw tempo changes directly onto the graph. In the tempo list, you can insert, edit, and delete individual tempo changes. To open the Tempo view, choose Views > Tempo or press ALT+SHIFT+5. Click the Tempo List button to display or hide the tempo list.
Figure 95. The Tempo view
Table 59.  
Controls how often you can insert tempo changes—for example, every measure, every eighth note, every 3 samples, etc.
If you make a mistake using any of these tools, you can use Edit > Undo to correct the error. When you use the Freehand tool, the speed with which you drag the mouse determines the density of tempo events. To insert a larger number of relatively small tempo changes, move the mouse slowly. To insert a smaller number of relatively large tempo changes, drag the mouse quickly.
Table 60.  
1.
Enable Groove Clip Looping on any audio clips that you want to follow the tempo changes. Do this by selecting one or more clips, right-clicking a selected clip, and choosing Groove > Clip Looping from the pop-up menu. Each clip that has Groove Clip Looping enabled has beveled edges instead of sharp corners. The same command disables Groove Clip Looping on any selected clip that has Groove Clip Looping enabled.
2.
Click the Tempo List button to display or hide the tempo list.
4.
Click Insert Tempo to open the Tempo dialog box.
6.
1.
Enable Groove Clip Looping on any audio clips that you want to follow the tempo changes. Do this by selecting one or more clips, right-clicking a selected clip, and choosing Groove > Clip Looping from the pop-up menu. Each clip that has Groove Clip Looping enabled has beveled edges instead of sharp corners. The same command disables Groove Clip Looping on any selected clip that has Groove Clip Looping enabled.
2.
Click the Tempo List button to display or hide the tempo list.
4.
Click Tempo Properties or double-click the tempo change to open the Tempo dialog box.
6.
1.
Enable Groove Clip Looping on any audio clips that you want to follow the tempo changes. Do this by selecting one or more clips, right-clicking a selected clip, and choosing Groove > Clip Looping from the pop-up menu. Each clip that has Groove Clip Looping enabled has beveled edges instead of sharp corners. The same command disables Groove Clip Looping on any selected clip that has Groove Clip Looping enabled.
2.
Click the Tempo List button to display or hide the tempo list.
3.
In the Tempo list, select the tempo change to be deleted.
4.
Click Delete Tempo , or press DELETE.

Copyright © 2024 Cakewalk, Inc. All rights reserved
Sitemap | Privacy Policy | Legal